
[] Best U-boot mod for TP-LINK 703N
If you purchased the 703N from our Amazon store or ebay store, your router is pre-loaded with this U-boot by default. You can jump to part two to learn how to use it. If you get your router from somewhere else, you can follow this article to update your u-boot so you won’t need you worry about bricking the router some day.
pepe2k from Openwrt forum made a very impressive U-boot for 703N. It starts from wr703n-uboot-with-web-failsafe project.
The best thing about this bootloader is, you can barely “brick” your router. You can do whatever you want to change IP, change Ethernet port configuration, enable/disable wireless. Of course, you can also play with the firmware in any way you want. After you make something evil, all you need to do is to load the default firmware in failsafe mode. After a reboot, your router is brand new again. The uboot has a few more features, we will talk about two modes that most people use most to recover 703N.
In this article we are mainly focus on how to flash your 703N to this amazing uboot, and also how to use the uboot. If you are interested in details, you can dig into the uboot code, since this project is open sourced.
Part 1 – Installation
For safety consideration, most Openwrt firmware disabled the uboot write permission, in other word, you cannot update the uboot with a normal firmware download from official website. I compiled this firmware, enabled the uboot write permission.
Download TP-link-703N-uboot-writable.bin here.
Upload it to the /tmp directory (You may need WinSCP to do it).
Open a SSH window, login with “root” account. And run the following command:
root@703N:~# mtd -r write /tmp/TP-LINK-uboot-writable.bin  firmware
Unlocking firmware ...

Writing from /tmp/TP-LINK-uboot-writable.bin to firmware ...
Rebooting ...
After a short while, you will see your 703N automatically reboots. After the LED becomes solid, connect to router using WIFI – the default SSID is OpenWRT, with no password. Login to the webpage 192.168.1.1. Setup the root user password. Note you need to setup root password to use the SSH interface.
Now, download the uboot here.
connect to SSH and run:
root@OpenWrt:~# mtd -r write /tmp/TP-LINK-updated-uboot.bin u-boot
Unlocking u-boot ...

Writing from /tmp/TP-LINK-updated-uboot.bin to u-boot ...
Rebooting ...
After the reboot, the new uboot is in your router.
Part 2 – How to use the uboot failsafe feature.
By pressing and holding the reset button for different duration, there are three modes you can choose:
web server (for ~3 sec)
U-Boot console (for ~5 sec)
NetConsole (for ~7 sec)
For web server mode and NetConsole mode, you need to set IP of your computer to 192.168.1.2(it needs to by exact 192.168.1.2!) with netmask of 255.255.255.0
When you push and hold the reset and power up, the LED should flash once a second. count to 3, and release the reset button, you will be able to ping and access the webpage by browsing 192.168.1.1

You can upload any firmware here to fix your “bricked” router.
When using NetConsole mode, instead push and hold the reset button 3 seconds before release, you count to 7. In NetConsole mode, only UDP port 6666 is open, in other word, you cannot ping the IP to see if it’s in correct mode or not. But you can use UDP tool Hercules setup utility to connect to UDP port 6666.
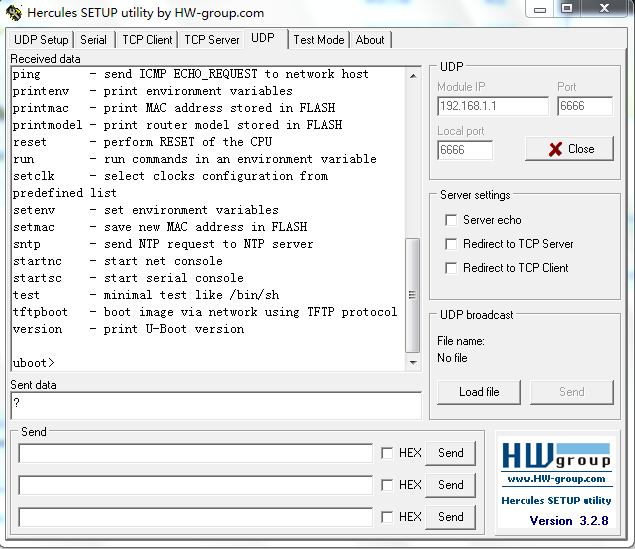
There are many command you can run here in Netconsole, BUT make sure you know what you are doing. You are directly talk to uboot, that you may easily brick the router for real. Once you messed up with uboot here, you need a programmer to get it back. The most common command we use is “setmac”. It write the MAC address to the flash so you can easily “clone” IP from other devices. I will have another article on it.
The U-Boot console is enabled if you press and hold reset button for 5 seconds. You need to open the router and connect a serial cable to the PCB, and talk with the router with serial port. Normally you don’t really need to do so, since you have the Netconsole can do almost the same thing. So, I will save some pages describing it. If you need further information on it, contact me privately.
Leave a Comment